Have you ever wondered about the art and precision behind sheet metal bending? In this detailed blog post, we explore the fascinating process of transforming flat metal sheets into complex forms. Our expert mechanical engineer uncovers the secrets behind various metal bending techniques, from press brake bending to mold bending, while discussing materials like aluminum and steel. Discover the essential equipment and methods that make sheet metal bending a crucial part of modern metal fabrication.
Sheet metal bending is a core forming process used to modify the geometry of metal sheets or panels by creating angular bends along a straight axis. This versatile method can produce various profiles, such as V-shapes, U-shapes, and even more intricate designs, making it essential for fabricating components across industries like automotive, aerospace, and construction.
Two primary methods dominate sheet metal bending: mold bending and press brake bending. Each method has distinct advantages and suits different production needs:
- Mold bending:
- Ideal for parts with intricate geometries and complex structures
- Suitable for both low-volume prototypes and high-volume runs
- Uses custom-designed dies for precise, repeatable results
- Ensures excellent dimensional stability and consistent quality
- Press brake bending:
- Best for larger sheet metal components
- Flexible, allowing quick changeovers between different bend profiles
- Cost-effective for low to medium production volumes
- Offers precise control over bend angles and radii with adjustable tooling
Choosing between these methods depends on factors such as part complexity, production volume, material properties, and required tolerances. Both techniques play a crucial role in modern metal bending techniques, providing unique characteristics tailored to specific fabrication needs.
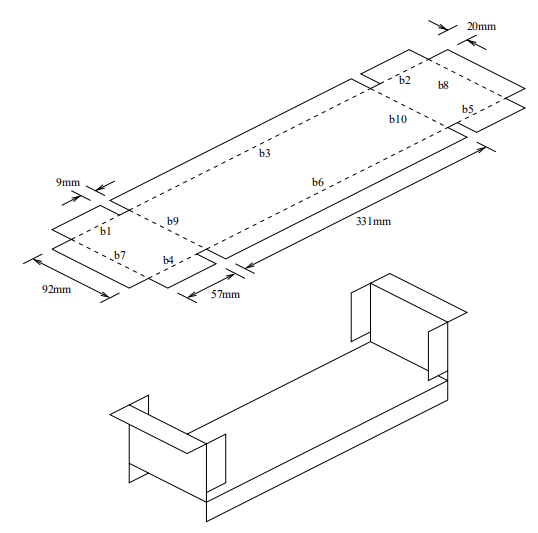
1. Materials and Common Metals
Sheet metal bending is a vital process in modern manufacturing, where material selection significantly impacts product performance and cost-effectiveness. This section explores the most commonly used metals in sheet metal bending, highlighting their properties, applications, and unique characteristics that affect formability and the overall quality of the final product.
Steel
Steel, an iron-carbon alloy, is the cornerstone of sheet metal bending due to its exceptional strength-to-cost ratio and versatility. Various grades of steel provide a range of properties tailored for different bending applications:
- Mild Steel (Low Carbon Steel): Contains 0.05% to 0.25% carbon, offering excellent formability and weldability. Its low yield strength allows for easy bending, making it ideal for automotive body panels, structural components, and general fabrication. However, its susceptibility to corrosion requires protective coatings for many applications.
- Stainless Steel: Alloyed with a minimum of 10.5% chromium, stainless steel boasts superior corrosion resistance due to the formation of a self-healing chromium oxide layer. Common grades include:
- 304 (austenitic): Offers excellent formability and corrosion resistance; widely used in food processing equipment and medical devices.
- 316 (austenitic): Enhanced corrosion resistance from molybdenum content; preferred for marine and chemical processing environments.
- 430 (ferritic): Magnetic with good formability; commonly used in automotive trim and appliances.
- High-Strength Low-Alloy (HSLA) Steel: Delivers improved strength and formability compared to mild steel, achieved through micro-alloying elements like niobium or vanadium. HSLA steels are increasingly utilized in the automotive and aerospace industries for weight reduction while maintaining structural integrity.
Aluminum
Aluminum alloys offer an optimal balance of lightweight properties, corrosion resistance, and formability, making them essential in industries that prioritize weight reduction and durability:
- Alloy 5052: Known for its excellent formability and corrosion resistance; commonly used in marine applications, electronic enclosures, and fuel tanks.
- Alloy 6061: Offers good strength and weldability; widely utilized in structural components, transportation equipment, and machine parts.
- Alloy 3003: Features high formability and moderate strength; ideal for general sheet metal work, HVAC components, and cookware.
Key advantages of aluminum in sheet metal bending include:
- Superior strength-to-weight ratio, enabling lightweight designs
- Natural corrosion resistance due to oxide layer formation
- Compatibility with various surface finishing techniques, including anodizing and powder coating
- Excellent thermal and electrical conductivity
Copper
Copper’s unique combination of high electrical conductivity, thermal management properties, and formability makes it irreplaceable in specific applications:
- Electrical conductivity: 100% IACS (International Annealed Copper Standard), establishing the benchmark for electrical applications.
- Thermal conductivity: 401 W/(m·K), facilitating efficient heat dissipation in thermal management systems.
- Antimicrobial properties: Inherent characteristics that make copper suitable for healthcare and public space applications.
Common copper grades for sheet metal bending include:
- C11000 (Electrolytic Tough Pitch): Known for its high conductivity, commonly used in electrical busbars and roofing.
- C12200 (DHP Copper): Offers excellent formability, making it ideal for plumbing and HVAC applications.
Brass
Brass, an alloy primarily composed of copper and zinc, offers a unique combination of properties that make it valuable for both functional and aesthetic applications:
- Excellent machinability and formability: Enables the creation of complex shapes and fine details.
- Corrosion resistance: Particularly effective in freshwater environments.
- Attractive appearance: Its golden hue makes it a popular choice for decorative and architectural elements.
Common brass alloys used in sheet metal bending include:
- C26000 (Cartridge Brass): Composed of 70% Cu and 30% Zn; known for excellent formability and commonly used in hardware and ammunition casings.
- C36000 (Free-Cutting Brass): Contains lead to enhance machinability; ideal for precision components.
When selecting materials for sheet metal bending, it’s crucial to consider not only the material properties but also specific bending requirements, such as bend radius, springback compensation, and the potential for stress cracking. Advanced finite element analysis (FEA) and simulation tools are increasingly employed to optimize material selection and bending parameters, ensuring successful outcomes in complex sheet metal forming operations.
2. Bending Techniques
Air Bending
Air bending is a versatile and widely used technique in sheet metal fabrication. The process involves positioning the workpiece on a V-shaped die while a punch descends to apply controlled pressure. As the punch penetrates, the sheet metal deforms elastically and plastically, creating a bend. The final bend angle is determined by the depth of punch penetration, material properties (such as yield strength and thickness), and die opening width. Key advantages of air bending include:
- Low tooling costs, as multiple angles can be achieved with a single set of tools.
- Enhanced flexibility, allowing quick angle adjustments without changing tools.
- Reduced die wear, since the sheet metal doesn’t fully conform to the die shape.
- Minimal tonnage requirements, enabling the use of smaller-capacity press brakes.
Coining
Coining is a precision bending technique that employs substantial force to plastically deform the sheet metal into a die cavity. During this process, the punch and die are pressed together with the workpiece sandwiched between them, causing the material to flow and conform precisely to the tooling geometry. This method offers several benefits:
- Exceptional accuracy and repeatability, with tolerances as tight as ±0.1°.
- Significantly reduced springback effects due to complete plastic deformation.
- Increased material strength in the bend area through work hardening.
- Ability to create complex forms and embossed features in a single operation.
Three-Point Bending
Three-point bending is a fundamental technique used for both material testing and practical fabrication applications. In this method, the sheet metal is supported at two points, with a controlled force applied at a third point between the supports. This approach provides:
- Even distribution of stress and strain across the specimen or workpiece.
- Valuable insights into material behavior under bending loads, including yield strength and elastic modulus.
- Versatility in testing various materials and thicknesses.
- Ability to create precise, repeatable bends in production environments.
- Useful data for finite element analysis (FEA) and computer-aided engineering (CAE) simulations.
V-Die Bending
V-die bending is a cornerstone technique in the sheet metal industry, offering a balance of versatility and precision. This process utilizes a V-shaped punch and corresponding die to apply pressure and form the desired bend angle. Key features of V-die bending include:
- High precision and accuracy, with typical tolerances of ±0.5° to ±1°.
- Consistency across different parts due to the fixed geometry of the tooling.
- A wide range of bend radii and angles possible by varying die sizes and punch penetration.
- Ability to handle a broad spectrum of material thicknesses and types.
- Reduced marking on sensitive materials compared to coining.
3. Bending Equipment
Press Brake
Press brakes are versatile machines used in sheet metal bending that provide high precision and repeatability in producing complex shapes. They utilize a punch and die system to apply concentrated force on the workpiece, creating accurate bends. Modern press brakes come in various configurations, including hydraulic, mechanical, and electric servo-driven models, each catering to specific production needs:
- Hydraulic: Offers consistent force throughout the stroke, making it ideal for heavy-duty applications.
- Mechanical: Provides high-speed operation, suitable for high-volume production of simpler parts.
- Electric Servo: Delivers superior accuracy and energy efficiency, perfect for precision components.
The capacity of a press brake is determined by factors such as working length, tonnage, and the sophistication of the control system. Advanced CNC-controlled press brakes can achieve complex multi-axis bending, tool changes, and real-time force monitoring for optimal results.
Folding Machine
Folding machines, also known as panel benders, are specialized equipment designed for the efficient production of large, complex sheet metal parts. They employ a clamping beam to secure the workpiece and a folding blade to create precise bends. This design allows for the manipulation of larger sheets and the creation of multiple bends without repositioning the material:
- Manual: Operated by skilled technicians for small-batch production or prototyping.
- Automated: Equipped with CNC controls for high-volume, complex part production with minimal operator intervention.
Folding machines excel in handling a wide range of materials, including aluminum, stainless steel, and galvanized steel. Their unique design often results in reduced marking on sensitive materials and the ability to produce parts with shorter flange lengths compared to traditional press brakes.
Bending Dies
Bending dies are critical components in sheet metal forming, directly influencing the final part’s geometry, accuracy, and surface quality. They are manufactured from high-performance materials such as tool steel, carbide-enhanced alloys, or tungsten carbide to ensure longevity and maintain precision under repeated use:
- V-dies: Versatile and widely used for air bending and bottom bending, available in various angles to achieve different bend radii.
- Rotary bending dies: Feature rotating elements that significantly reduce friction, making them ideal for materials prone to scratching or when working with pre-finished surfaces.
- Wiping dies: Utilize a wiping action to create tight-radius bends, often used in the production of complex profiles and channels.
Advanced die designs may incorporate features such as spring-loaded pressure pads for improved material control or carbide inserts for extended tool life in high-volume production environments. Selecting the appropriate dies is crucial for achieving desired tolerances, minimizing springback, and optimizing overall bending efficiency.
4. Standards and Certifications
ISO Standards
To ensure quality, safety, and consistency in sheet metal bending operations, adherence to specific international standards is essential. The International Organization for Standardization (ISO) develops and maintains these regulations. Relevant standards for sheet metal bending include:
- ISO 9013: This standard specifies requirements for thermal cutting methods, including laser cutting and plasma cutting, which are often used in sheet metal preparation before bending. It defines quality characteristics, technical delivery conditions, and tolerances for thermally cut surfaces.
- ISO 16630: This standard outlines mechanical testing methods to verify the structural integrity and mechanical properties of sheet metal materials. It specifically describes the procedure for conducting tube flattening tests, which are crucial for assessing the formability and ductility of tubular metal products.
- ISO 7438: This standard details the bend test method for metallic materials, essential for evaluating the ductility and formability of sheet metals used in bending operations.
- ISO 6892-1: This standard specifies the method for tensile testing of metallic materials at room temperature, providing valuable data on material properties that influence bending behavior.
Adherence to ISO standards ensures that sheet metal bending operations produce reliable, high-quality products across various industries and applications, while also facilitating international trade and collaboration.
ASTM Standards
The American Society for Testing and Materials (ASTM) plays a critical role in the sheet metal bending industry by establishing and maintaining standards. Key ASTM standards relevant to sheet metal bending include:
- ASTM A6/A6M: This standard outlines general requirements for rolled steel plates, shapes, sheet piling, and bars used in various applications, including sheet metal bending. It covers dimensional tolerances, permissible variations, and testing procedures.
- ASTM A480/A480M: This standard specifies general requirements for flat-rolled stainless and heat-resisting steel plate, sheet, and strip used in sheet metal bending. It includes details on chemical composition, mechanical properties, and surface finish requirements.
- ASTM E290: This standard defines methodologies for conducting bend tests on metallic materials to assess ductility and formability. It provides guidelines for various bend test configurations, including guided bend tests and free bend tests.
- ASTM E8/E8M: This standard outlines methods for tension testing of metallic materials, crucial for determining the mechanical properties that influence bending behavior.
- ASTM B820: This standard covers specifications for metallic foils used in electrical insulation, relevant for sheet metal bending in electrical and electronic applications.
Compliance with ASTM standards ensures that sheet metal bending operations meet industry requirements and maintain a high level of product quality. These standards also provide a common language for manufacturers, suppliers, and customers, facilitating clear communication and expectations in the sheet metal industry.
5. Bending by Mold
Mold bending is often chosen by manufacturers as a processing method for structural parts with an annual capacity exceeding 5,000 pieces and relatively small dimensions, typically around 300 x 300 mm.
5.1. Common Bending Molds
Figure 2 illustrates the commonly used bending dies in the industry. To enhance the longevity and durability of the molds, it is advisable to incorporate rounded corners during the design of the parts. This design consideration not only extends the lifespan of the molds but also improves the quality of the bends, ensuring consistent performance in sheet metal bending operations.
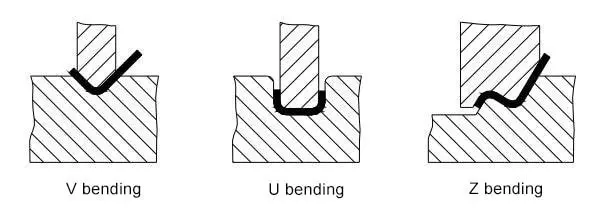
Using a bending die with an inadequate flange height can lead to poor forming results. Generally, the flange height should be at least L≥3tL≥3t, where tt represents the wall thickness. This guideline ensures optimal performance during sheet metal bending, facilitating effective material flow and reducing the risk of deformation or defects in the finished part.
5.2. Step Bending Method
Z-shaped steps crafted from sheet metal with a lower profile are often bent using simple molds on punch presses or hydraulic presses for small batch sizes. For larger production runs, a step die on a bending machine can be employed; however, the height (H) should typically range from 0 to 1.0 times the wall thickness (t).
When the height is between 1.0 and 4.0 times the wall thickness, a mold with an unloading structure may be required. Although height adjustments can be made by adding a spacer, it may be challenging to maintain the length (L) and vertical alignment of the vertical side. If the height exceeds this range, utilizing a press brake machine is recommended for better control and accuracy in sheet metal bending.

6. Bending by Press Brake Machine
Bending machines can be categorized into two types: ordinary bending machines and CNC bending machines. CNC bending machines are predominantly used for sheet metal bending in communication devices, where high precision and intricate bend shapes are required.
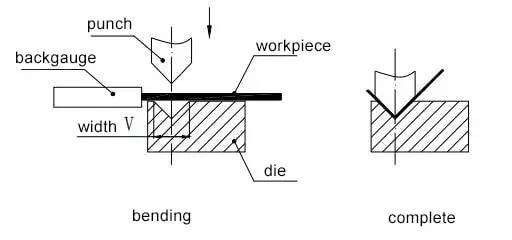
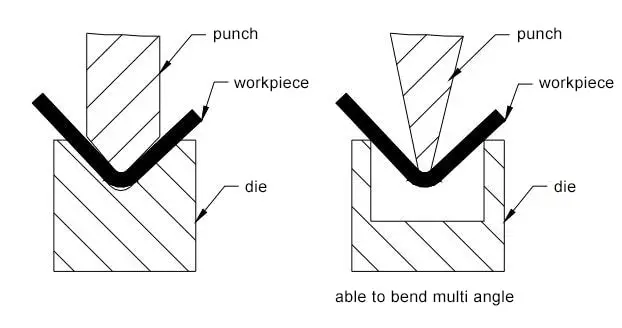
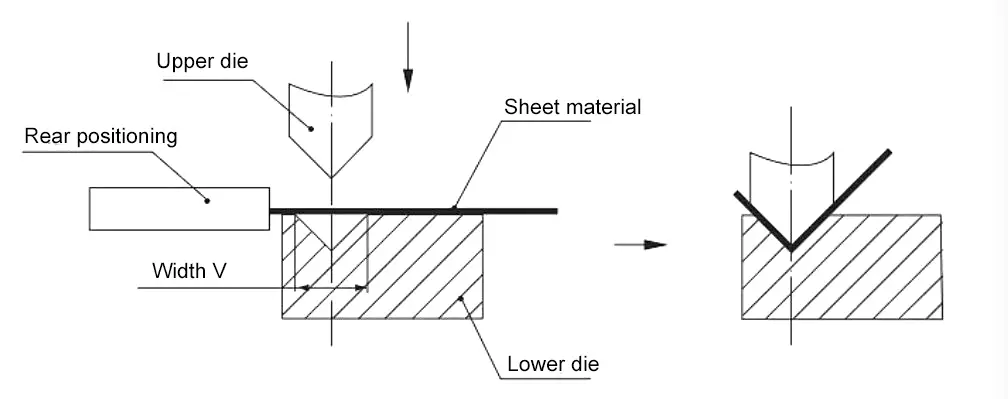
The basic operating principle involves shaping the sheet metal part using an upper mold, known as the bending punch, and a lower mold, which is the V-shaped die.
Advantages:
- Convenient clamping for efficient setup
- Accurate positioning for consistent results
- Fast processing speed for increased productivity
Disadvantages:
- Limited bending force, restricting capabilities to simple forms
- Lower efficiency compared to advanced machinery
6.1. Basic Principles of Forming
The basic principle of forming is illustrated in Figure 4:
The following are two key components of the bending machine:
6.1.1. Bending Knife (Upper Die)
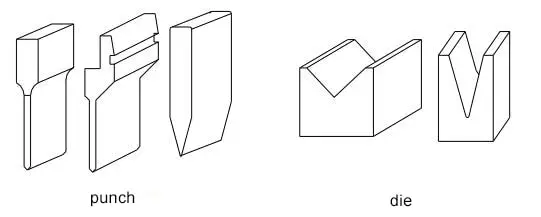
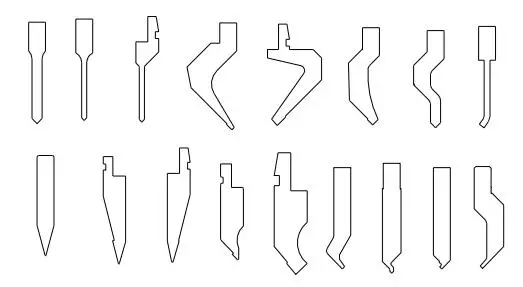
The design of the bending knives is shown in Figure 1-20. Their shape is primarily determined by the geometry of the workpiece.
Typically, processing tools offer a wide selection of bending knives. Specialized manufacturers can even custom-make a variety of unique shapes and specifications to accommodate complex bending tasks.
6.1.2. Lower Die
The V-shape of the lower die is typically defined as V=6tV=6t, where tt represents the material thickness.
Several factors influence the bending process, including:
- The arc radius of the upper die
- The material properties and thickness
- The strength of the lower die
- The size of the V-opening in the lower die
To accommodate various product requirements, manufacturers have standardized bending dies while prioritizing the safety of the bending machine.
Having a fundamental understanding of the available bending dies is essential during the structural design process.
Figure 5 displays the upper die on the left and the lower die on the right.
Basic Principles of the Bending Process Sequence:
- Bend from the inside to the outside.
- Progress from smaller to larger bends.
- Execute special shapes before general shapes.
- Ensure that completed processes do not affect or interfere with subsequent operations.
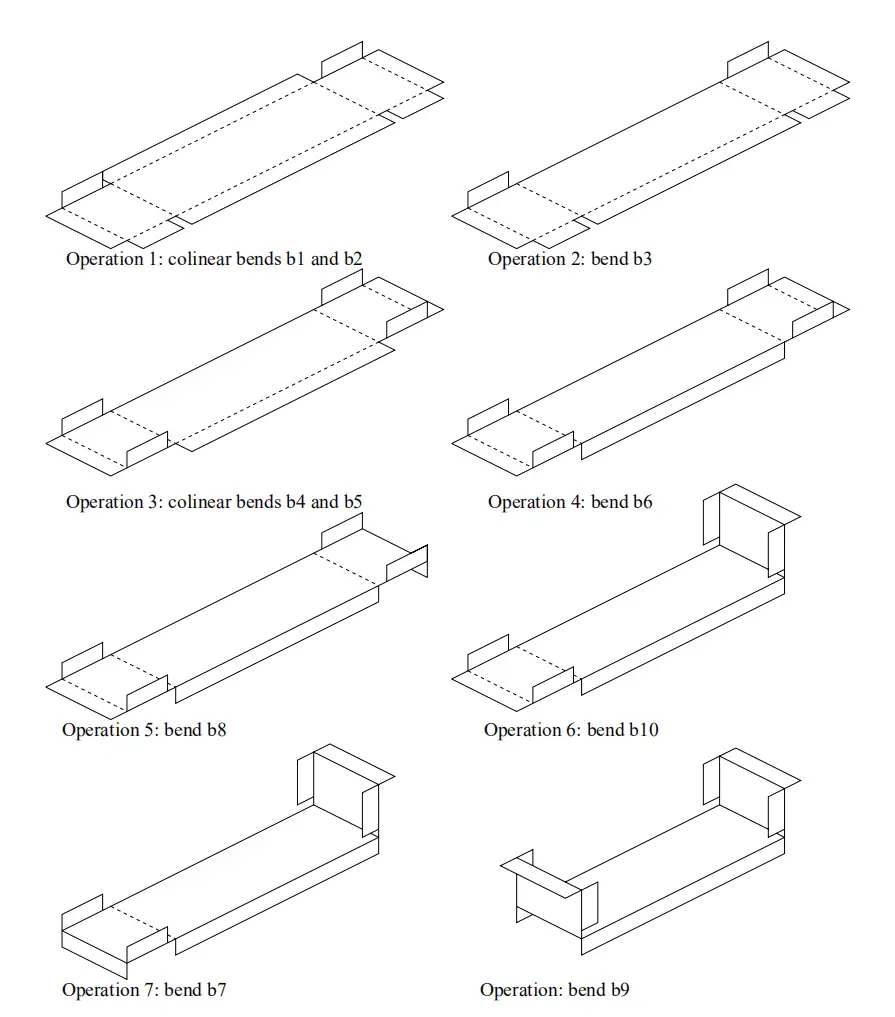
The bending forms commonly seen in outsourcing factories are illustrated in Figure 7.
6.2. Bending Radius
The bend radius is a critical factor in sheet metal bending that significantly influences the quality and integrity of the final product. Selecting an appropriate bend radius is essential; it should neither be too large nor too small.
A radius that is too small can lead to cracking during the bending process, compromising the material’s integrity. Conversely, if the bend radius is too large, it can cause excessive springback, making it difficult to achieve the desired angle.
Table 1 presents the preferred bend radius (inside bend radius) for various materials based on their thicknesses.
| Material | Annealed state | Cold work hardening state | ||
|---|---|---|---|---|
| The corresponding position of the direction of the bending line and the direction of the fiber | ||||
| vertical | parallel | vertical | parallel | |
| 08,10 | 0.1t | 0.4 t | 0.4 t | 0.8 t |
| 15,20 | 0.1 t | 0.5 t | 0.5 t | 1.0 t |
| 25,30 | 0.2 t | 0.6 t | 0.6 t | 1.2 t |
| 45,50 | 0.5 t | 1.0 t | 1.0 t | 1.7 t |
| 65Mn | 1.0 t | 2.0 t | 2.0 t | 3.0 t |
| Aluminum | 0.1 t | 0.35 t | 0.5 t | 1.0 t |
| Copper | 0.1 t | 0.35 t | 1.0 t | 2.0 t |
| Soft brass | 0.1 t | 0.35 t | 0.35 t | 0.8 t |
| Semi-hard brass | 0.1 t | 0.35 t | 0.5 t | 1.2 t |
| Phosphor bronze | —— | —— | 1.0 t | 3.0 t |
It is important to note that the data presented in Table 1 is for reference purposes only and should not be considered definitive. In practice, most manufacturers utilize bending knives with a rounded corner of 0.3 mm, while only a few opt for a rounded corner of 0.5 mm.
Typically, the inner bend radius for our sheet metal parts is set at 0.2 mm. This radius is generally sufficient for standard low-carbon steel plates, rust-resistant aluminum plates, brass plates, and copper plates. However, it may not be adequate for high-carbon steel, hard aluminum, and super-hard aluminum. In such cases, using a rounded corner of 0.2 mm may lead to bending failures, resulting in breakage or cracking at the outer corner.
6.3. Bending Rebound
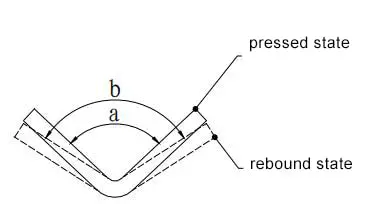
1) Rebound Angle (Δα)
The rebound angle is calculated as follows:
Δα=b-a
Where:
- b = actual angle of the workpiece after rebound
- a = angle of the mold
2) Size of the Rebound Angle
The rebound angle at a 90° air bend is presented in Table 2.
Table 2 Rebound angle at 90-degree air bend
| Material | r/t | Thickness t(mm) | ||
|---|---|---|---|---|
| <0.8 | 0.8~2 | >2 | ||
| Low-carbon steel | <1 | 4° | 2° | 0° |
| Brass σb=350MPa | 1~5 | 5° | 3° | 1° |
| Aluminum, zinc | >5 | 6° | 4° | 2° |
| Medium carbon steel σb=400-500MPa | <1 | 5° | 2° | 0° |
| Hard yellow copper σb=350-400MPa | 1~5 | 6° | 3° | 1° |
| Hard bronze σb=350-400MPa | >5 | 8° | 5° | 3° |
| High carbon steel σb>550Mpa | <1 | 7° | 4° | 2° |
| 1~5 | 9° | 5° | 3° | |
| >5 | 12° | 7° | 6° | |
Factors Affecting Rebound and Measures to Reduce Rebound
The magnitude of the rebound angle is directly proportional to the yield point of the material and inversely proportional to its elastic modulus (E). Thus, when working with sheet metal parts that require high precision, it is advisable to use low-carbon steel instead of high-carbon steel or stainless steel to minimize rebound.
It is essential to understand that the degree of deformation decreases as the relative bending radius (r/t) increases. Conversely, the rebound angle (Δα) increases as the relative bending radius decreases.
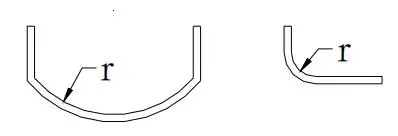
To achieve higher accuracy, it is recommended to design sheet metal bends with a small bend radius and rounded corners. Avoid using large arcs, as illustrated in Figure 9, since they are challenging to produce and control for quality.
6.4. Calculation of the Minimum Bend Edge of a Bend
The initial state of an L-shaped bend is illustrated in Figure 10.
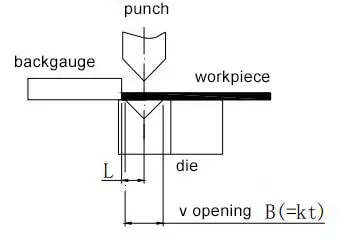
A critical factor in this process is the width B of the lower mold.
The bending process and mold strength necessitate a minimum mold width for different material thicknesses. If the width falls below this minimum, issues such as misaligned bends or damaged molds may occur.
Minimum Mold Width Equation
Practical experience indicates that the relationship between the minimum mold width and material thickness can be expressed by the following equation:
Bmin=k⋅T (1)
Where:
- Bmin = minimum mold width
- T = material thickness
- k=6 for this calculation
Commonly Used Mold Width Specifications
Manufacturers typically use the following mold widths: 4, 5, 6, 8, 10, 12, 14, 16, 18, 20, and 25 mm.
Determining Minimum Mold Width
Using the equation above, the minimum mold width for various material thicknesses can be determined. For example, when bending a 1.5 mm thick plate:
B=6×1.5=9 mm
From the specified series of mold widths, you can choose either a 10 mm or 8 mm lower mold width.
Shortest Bend Edge Equation
From the initial bend state diagram, it is evident that the bend edge cannot be excessively short. Combining this with the minimum mold width, the equation for determining the shortest bend edge is:
Lmin=(Bmin+Δ)/2+0.5 (2)
Where:
- Lmin = shortest bend edge
- Bmin = minimum mold width
- Δ = sheet’s bending coefficient
For a 1.5 mm thick plate, the shortest bend edge can be calculated as follows:
Lmin=(8+2.5)/2+0.5=5.75 mm (including plate thickness)
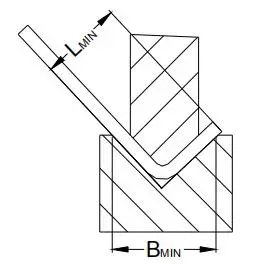
Table 3: Inner bending radius of cold rolled steel sheet material R and minimum bending height reference table
| No. | Thickness | V opening | Punch radius R | Min bending height |
|---|---|---|---|---|
| 1 | 0.5 | 4 | 0.2 | 3 |
| 2 | 0.6 | 4 | 0.2 | 3.2 |
| 3 | 0.8 | 5 | 0.8 or 0.2 | 3.7 |
| 4 | 1 | 6 | 1 or 0.2 | 4.4 |
| 5 | 1.2 | 8(or 6) | 1 or 0.2 | 5.5(or 4.5) |
| 6 | 1.5 | 10(or 8) | 1 or 0.2 | 6.8(or 5.8) |
| 7 | 2 | 12 | 1.5 or 0.5 | 8.3 |
| 8 | 2.5 | 16(or 14) | 1.5 or 0.5 | 10.7(or 9.7) |
| 9 | 3 | 18 | 2 or 0.5 | 12.1 |
| 10 | 3.5 | 20 | 2 | 13.5 |
| 11 | 4 | 25 | 3 | 16.5 |
Notes:
- The minimum bend height is determined by the material thickness.
- For acute V-bends, the shortest bend edge must be increased by 0.5 mm.
When bending aluminum or stainless steel plates, the minimum bending height may vary slightly: aluminum typically requires a smaller bending height, while stainless steel requires a larger one. Please refer to the table above for further details.
6.5. Minimum Bend Height for Z-Bends
Figure 12 illustrates the initial state of the Z-bend. The Z-bend process shares similarities with the L-bend process and faces the same minimum bend edge challenges. However, the shortest edge of the Z-bend is generally larger than that of the L-bend due to the structure of the lower die.
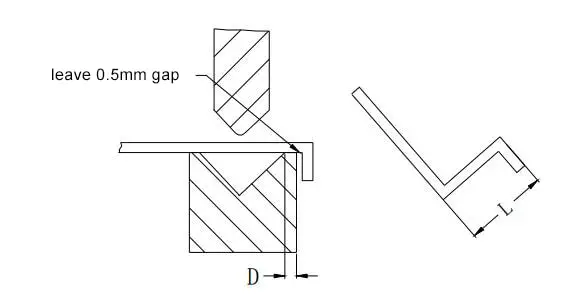
Minimum Bend Edge Calculation
The formula used to calculate the minimum edge of the Z-bend is as follows:
Lmin=(Bmin+Δ)/2+D+0.5+T (3)
Where:
- Lmin = shortest bend edge
- Bmin = minimum mold width
- Δ = bending coefficient of the sheet
- T = material thickness
- D = structural size of the lower die to the edge (typically greater than 5 mm)
Minimum Bend Size Table
The minimum bend size L for sheet metal Z-bends of different material thicknesses is shown in Table 4 below:
Table 4 Minimum height of Z bend
| No | Thickness | V opening | Punch radius R | Z -bend height L |
|---|---|---|---|---|
| 1 | 0.5 | 4 | 0.2 | 8.5 |
| 2 | 0.6 | 4 | 0.2 | 8.8 |
| 3 | 0.8 | 5 | 0.8 or 0.2 | 9.5 |
| 4 | 1 | 6 | 1 or 0.2 | 10.4 |
| 5 | 1.2 | 8(or 6) | 1 or 0.2 | 11.7(or 10.7) |
| 6 | 1.5 | 10(or 8) | 1 or 0.2 | 13.3(or 12.3) |
| 7 | 2 | 12 | 1.5 or 0.5 | 14.3 |
| 8 | 2.5 | 16(or 14) | 1.5 or 0.5 | 18.2(or 17.2) |
| 9 | 3 | 18 | 2 or 0.5 | 20.1 |
| 10 | 3.5 | 20 | 2 | 22 |
| 11 | 4 | 25 | 3 | 25.5 |
Interference During Bending
In secondary or higher-order bending processes, interference between the workpiece and the tool often occurs. Figure 13 illustrates the interfering area, depicted in black, which can hinder successful bending or cause unwanted deformation.
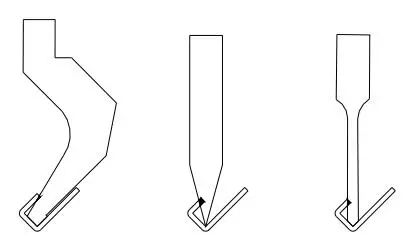
The interference issue in sheet metal bending is straightforward, primarily involving an understanding of the bending die’s shape and size to avoid complications in design. Figure 14 shows the cross-sectional shapes of various typical bending dies, as detailed in the sheet metal mold manual, with corresponding tool entities available in the intralink library.
If there is uncertainty in the design, a direct assembly interference test can be conducted using the tool, following the principle illustrated in the figure.
Flip Hole Tapping Considerations
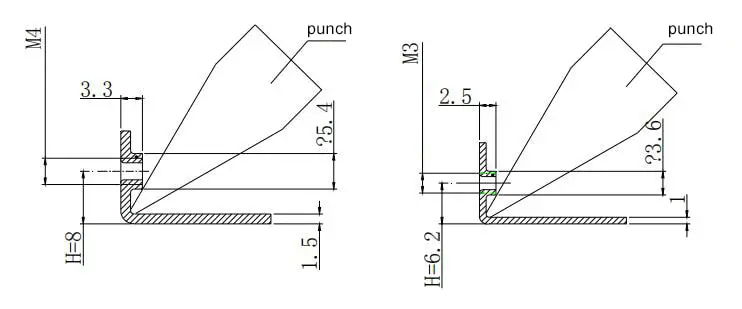
When performing flip hole tapping, it’s crucial to avoid designing the diameter D (as shown in Figure 15) too small. The minimum value of D can be calculated or plotted based on factors such as:
- Material thickness
- Outer diameter of the through hole
- Height of the flange hole
- Selected parameters of the bending tool
For example, when performing M4 flip hole tapping on a 1.5 mm sheet, D should be greater than 8 mm to prevent contact between the bending tool and the flange.
6.6. Minimum Distance Between the Hole and the Oblong Hole
Figure 16 illustrates that if the edge of a hole is positioned too close to the bending line, the bending process may cause deformation, preventing the hole from retaining its original shape. To mitigate this risk, it is essential to maintain a distance between the hole’s edge and the bending line that is greater than or equal to the minimum hole margin, expressed as X≥t+R, where t is the material thickness and R is the bend radius.
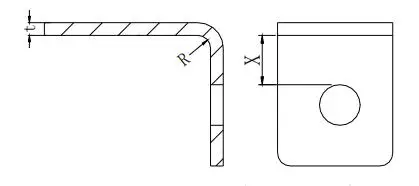
Table 4 Minimum distance from the round hole to the bent edge
| Thickness | 0.6~0.8 | 1 | 1.2 | 1.5 | 2 | 2.5 |
|---|---|---|---|---|---|---|
| Min Distance X | 1.3 | 1.5 | 1.7 | 2 | 3 | 3.5 |
Figure 17 shows an elongated hole situated too close to the fold line. In this case, the material cannot be properly accommodated during the bending process, leading to deformation of the hole’s shape. Therefore, it is critical to ensure that the distance between the hole edge and the bend line exceeds the minimum hole margin specified in Table 5. The appropriate bend radius can be found in Table 1.
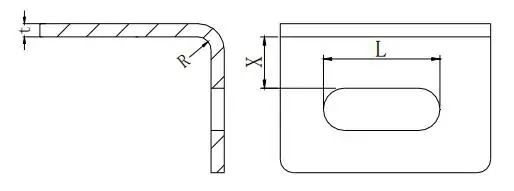
Table 5 Minimum distance from the long round hole to the bent edge
| L | <26 | 26~50 | >50 |
|---|---|---|---|
| Min distance X | 2t+R | 2.5t+R | 3t+R |
For less critical holes, it is permissible to extend them to the bend line, as depicted in Figure 18. However, this approach may compromise the appearance of the final product.
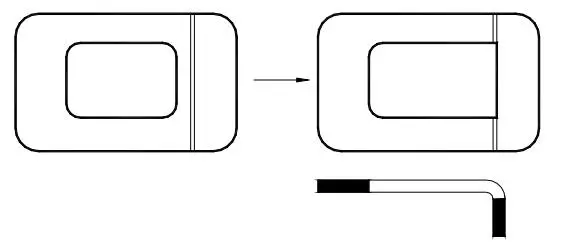
Figure 18 Improved bending design
6.7. Special Processing When the Hole is Close to the Bend
If the distance between the closest hole and the bend line is less than the minimum required distance, deformation may occur after bending. To address product requirements, potential solutions can be found in Table 6. However, it is important to note that these methods may lack technical precision, and structural design adjustments should be avoided whenever possible.
Table 6 Special processing when the hole is close to the bend
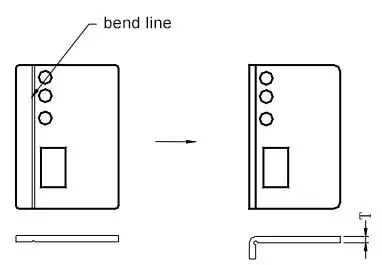 | Press the Groove Before Bending: In actual design scenarios, the required distance may be smaller than ideal due to structural constraints. Manufacturers often press a groove before bending, as shown in Figure 1-31. However, this method has disadvantages, including an additional processing step that lowers efficiency and precision. It should be avoided when possible. |
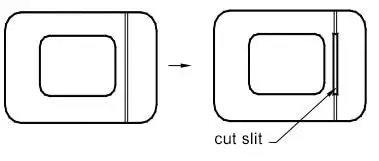 | Cut Hole or Line Along the Bend Line: If the bend line does not affect the appearance of the workpiece or if the change is acceptable, hole cutting can improve the bending process. The downside is that this can affect the appearance, and cutting a line or a narrow groove typically requires a laser cutting machine. |
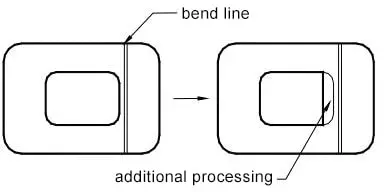 | Finish to the Design Size After Bending: When maintaining the hole margin is crucial, this method can be employed. However, secondary material removal usually cannot be accomplished on a punching machine and must be done with a laser cutting machine, which can complicate positioning and increase processing costs. |
 | Reaming After Bending: If a hole is very close to the bend line and the distance is less than the minimum hole distance, reaming can be performed after bending to avoid drawing issues. This involves cutting a small concentric circle (usually with a diameter of Φ1.0) before bending, then reaming to the original size afterward. This method can be inefficient due to the increased number of steps involved. |
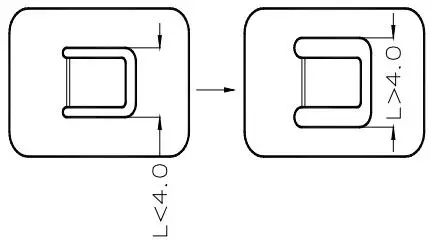 | Minimum Width of the Upper Die: Currently, the minimum width of the bending machine’s upper die is 4.0 mm. Consequently, holes in the bending part of the workpiece should not be less than this dimension. If they are, the openings must be enlarged or an easy-to-form die should be used. The disadvantages of this approach include low efficiency in producing the easy mold and the potential impact on appearance from reaming. |
Processing Holes, Slots, and Notches for Curved Parts
When designing bends, it is advisable to incorporate a punching process hole, process groove, or process notch before blanking if the bend needs to be made on the inner side of the blank, as shown in Figure 24.
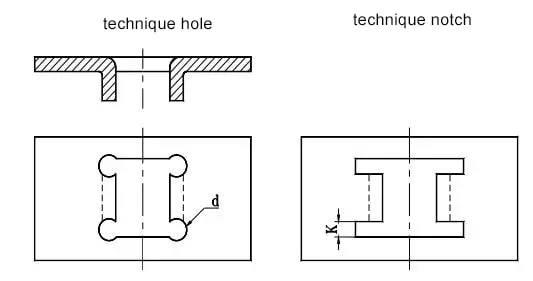
- Process Hole:
- Diameter of the process hole (D): d≥t (where tt is the material thickness).
- Process Notch:
- Width of the process notch (K): K≥t.
Crack Avoidance Groove or Cut Slit
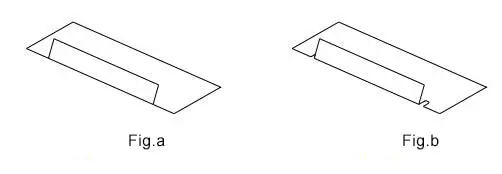
To prevent tearing and edge distortion during bending, it is often necessary to design a crack avoidance groove or cut slit, particularly when the inner bend radius is less than 60 degrees. Key design considerations include:
- Width of the Slit: Greater than the material thickness (t).
- Depth of the Slit: At least 1.5 times the thickness of the material.
As depicted in Figure 25, Figure B represents a better design option than Figure A.
Processing Guidelines
- Appearance Considerations:
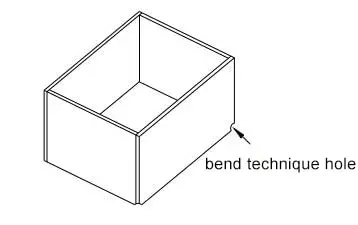
- If the appearance of the workpieces is a concern, particularly if visible from the panel, corner process holes for bending can be omitted. For example, the process notch may not be added during panel processing to maintain a uniform style. However, other bends should include a corner process hole, as shown in Figure 26.
- Gap Markings:
- When preparing design drawings, avoid marking the gap between bending intersections in the 90-degree direction unless explicitly required. Incorrect gap markings can adversely affect the manufacturing process design. Typically, manufacturers design with a gap of 0.2 to 0.3, as illustrated in Figure 27.
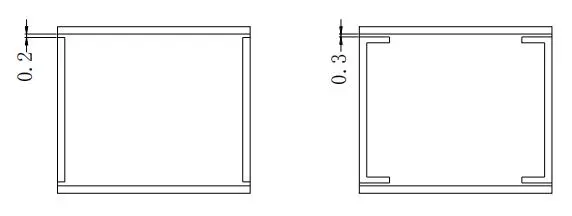
Figure 27 the gap between the bend lapping
6.8. Bending of a Sudden Change Position
When bending a component, it is essential to maintain a distance from areas with abrupt changes in shape. The bending area should be kept away from deformation zones to prevent issues during the bending process.
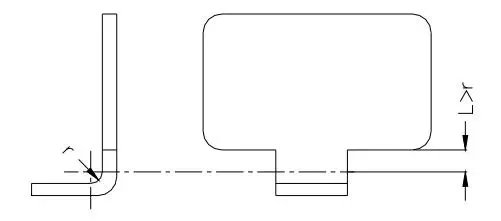
- Distance Requirement:
- The distance L from the bending line to the deformation zone must be greater than the bending radius (r), ensuring that L≥r. This principle is illustrated in Figure 28.
6.9 One-Time Hemming
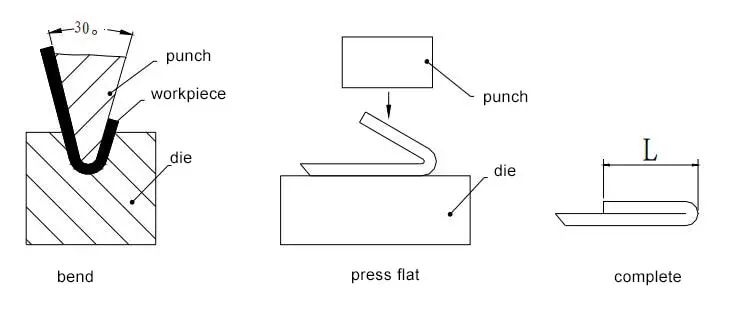
Hemming Method: The hemming process involves bending the sheet to a 30-degree angle using a corresponding 30-degree bending die, as illustrated in Figure 29. Following this, the bent edge is flattened.
- Minimum Bend Edge Dimension:
- The minimum edge dimension L in Figure 29 should be 0.5t, where tt represents the material thickness. This adheres to the minimum one-bend edge size specifications mentioned earlier.
- Material Considerations:
- The “pressed dead edge” technique is commonly employed for materials such as stainless steel, galvanized sheet, and aluminum-zinc plates.
- However, it is advisable to avoid using plated parts, as this may lead to acid entrapment at the hemming location.
6.10. 180° Bending
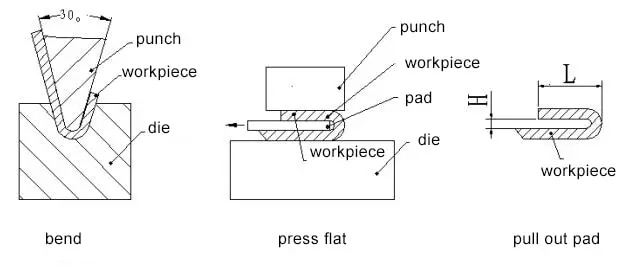
180-Degree Bend Method: As depicted in Figure 30, the process begins by folding the plate at a 30-degree angle using a 30-degree bending knife. After this initial fold, the bend edge is straightened, and finally, the backing pad is removed.
- Minimum Bend Edge Dimension:
- The minimum bend edge dimension L is equal to the minimum bend edge dimension of a single bend plus the material thickness tt.
- Height Selection:
- The height H should be chosen from commonly used plate sizes, which include 0.5, 0.8, 1.0, 1.2, 1.5, or 2.0. It is generally advised against selecting a height that exceeds these standard options.
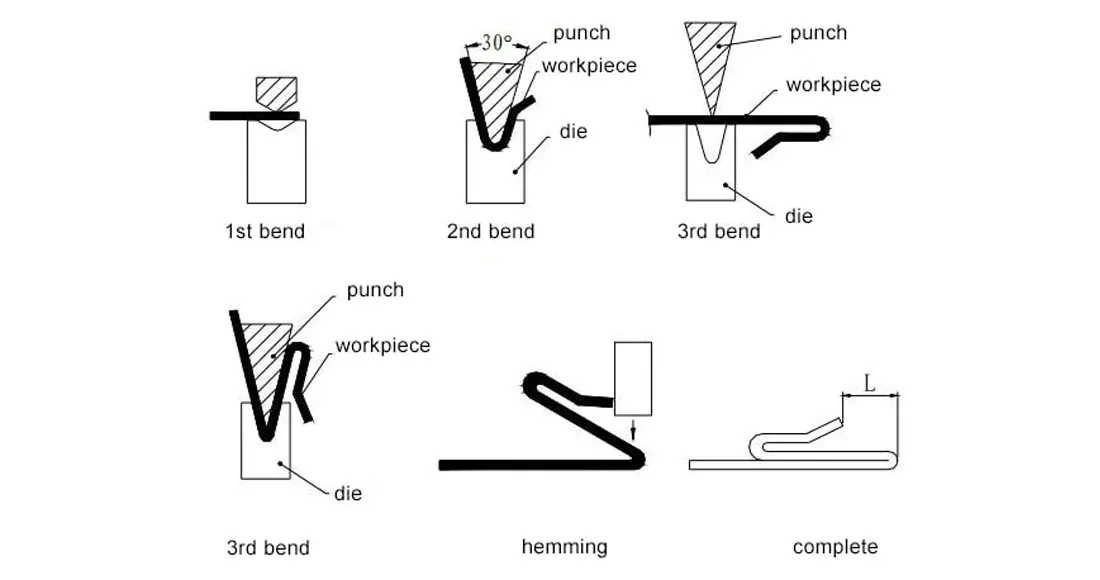
6.11. Triple Folding Hemming
As shown in Figure 31, the triple folding hemming process involves two key steps:
- Initial Fold: First, the shape is folded.
- Edge Fold: Next, the edge is folded.
Design Considerations:
- When designing the component, it’s essential to pay close attention to the dimensions of each part. This ensures that each stage of the folding process adheres to the minimum bend size requirements, thus preventing the need for additional post-processing.
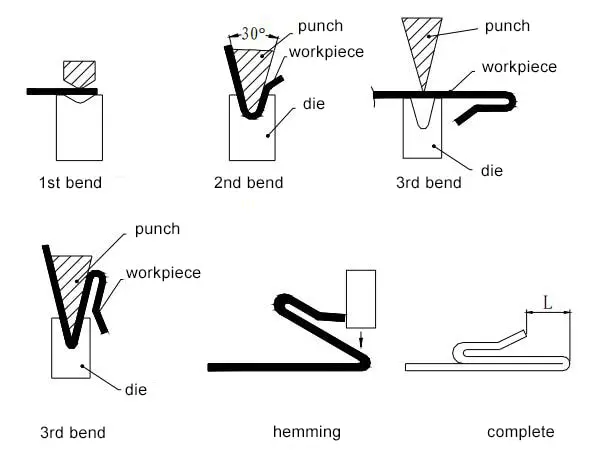
Table 7 Minimum bearing edge size required for final bending edge flattening
| Thickness | 0.5 | 0.6 | 0.8 | 1.0 | 1.2 | 1.5 | 2.0 | 2.5 |
|---|---|---|---|---|---|---|---|---|
| Bearing edge size L | 4.0 | 4.0 | 4.0 | 4.0 | 4.5 | 4.5 | 5.0 | 5.0 |
7. Safety Tips and Best Practices
When working with sheet metal bending, prioritizing safety and adhering to industry best practices is crucial for minimizing accident risks and ensuring operational efficiency. The following guidelines address vital aspects of workplace safety, material handling, and process optimization:
1. Personal Protective Equipment (PPE)
- Mandate the use of appropriate PPE, including safety glasses with side shields, cut-resistant gloves, steel-toed safety shoes, and hearing protection.
- For operations involving heavy materials or overhead work, hard hats are essential.
- When working with galvanized or coated metals, respiratory protection may be necessary to guard against harmful fumes.
2. Machine Guarding and Safety Systems
- Ensure all press brakes and bending machines are equipped with proper guarding mechanisms, such as light curtains, two-hand controls, or presence-sensing devices.
- Regularly test and maintain these safety systems to ensure their effectiveness in preventing accidents.
3. Ergonomic Considerations
- Implement ergonomic solutions to reduce the risk of repetitive strain injuries. This may include height-adjustable workstations, material handling aids, and proper training on lifting techniques.
- For large or heavy workpieces, utilize mechanical lifting devices or team lifting procedures.
4. Tool and Equipment Maintenance
- Establish a rigorous preventive maintenance schedule for all bending equipment, dies, and tooling.
- Regular inspections, cleaning, and lubrication are critical for preventing malfunctions that could lead to accidents or quality issues.
- Keep detailed maintenance logs and promptly address any identified issues.
5. Comprehensive Employee Training
- Develop a thorough training program covering:
- Safe operation of bending equipment and associated tools
- Material handling techniques and limitations
- Recognition and mitigation of potential hazards
- Emergency procedures and first aid
- Proper use and maintenance of PPE
6. Material Selection and Handling
- Choose materials based on their mechanical properties, formability, and suitability for the intended application. Consider factors such as yield strength, tensile strength, and elongation when selecting sheet metal for bending operations.
- For challenging materials like high-strength steels or titanium alloys, consult material-specific bending guidelines to prevent springback issues or cracking.
- Implement proper storage and handling procedures to prevent material damage or degradation that could affect bending performance.
7. Process Optimization
- Utilize computer-aided design (CAD) and finite element analysis (FEA) software to simulate bending operations and optimize bend sequences, minimizing stress concentrations and potential defects.
- For precision bending, consider using CNC press brakes with angle measurement systems to ensure accuracy and repeatability.
- Implement lean manufacturing principles to streamline workflow, reduce material handling, and minimize potential safety hazards.
8. Workspace Organization
- Apply 5S principles (Sort, Set in order, Shine, Standardize, Sustain) to maintain a clean, organized workspace.
- Clearly mark walkways, storage areas, and workstations to prevent congestion and tripping hazards.
- Ensure proper ventilation and lighting in all work areas to enhance visibility and reduce fatigue.
9. Quality Control and Continuous Improvement
- Implement a robust quality control system, including in-process inspections and final product verification.
- Encourage a culture of continuous improvement, empowering workers to identify and report potential safety hazards or process inefficiencies.
- Regularly review and update safety protocols and best practices based on industry standards, technological advancements, and lessons learned from near-miss incidents or accidents.
By meticulously adhering to these safety guidelines and best practices, sheet metal bending operations can be conducted with a high degree of professionalism, efficiency, and, most importantly, safety. This comprehensive approach not only protects workers but also contributes to improved product quality and overall operational excellence.
8. The Development and Application of Sheet Metal Bending Technology
With the rapid advancements in the global industrial equipment sector, high-performance automation equipment is increasingly entering the sheet metal processing field, providing essential productivity guarantees for the industry’s high-quality development. The trend of industrial globalization has intensified competition and challenges, leading to constantly evolving market demands. This necessitates not only high productivity levels for the main equipment but also greater flexibility and rapid-switching capabilities across the entire production system.
Importance of Sheet Metal Bending
As a key process technology in metal processing, sheet metal bending is indispensable in the production of metal products. Traditional single-machine bending operations often result in equipment downtime during order switches due to excessive manual interventions, including checking drawings, bending programming, adjusting equipment parameters, and handling materials. This downtime increases production costs and hampers efficiency.
Innovative Solutions
To address these challenges, research is focusing on process design, mold innovation, automation, informatization, and intelligent technology integration. This involves optimizing product process structures, enhancing mold material controllability and switching speeds, leveraging industrial internet technology for data transmission, integrating PLC interactive control systems, and applying production informatization management systems.
The information management system enables real-time data collection, processing, and analysis throughout the sheet metal bending production process. Through cloud computing platforms, remote monitoring and management of data can be achieved, optimizing production processes. The integration of automated production lines, incorporating machine tools, industrial robots, automated loading and unloading systems, and online inspection systems significantly enhances the controllability of the production process. This automation reduces manual intervention, allowing for continuous production, improving efficiency, and ensuring more stable and reliable bending products.
Development of Bending Process Technology
The advancement of sheet metal bending technology is closely tied to upgrades in automation, informatization, and intelligent systems within the industry. As a critical link in the metalworking sector, the evolution of sheet metal bending processes reflects improvements in manufacturing capabilities and indicates future directions for the industry. The transition from initial manual operations to modern CNC automation has led to multiple significant transformations, each marked by improvements in production efficiency and product quality.
In early manual bending, metal plates were shaped using basic tools and human expertise. Although this method was adaptable, it suffered from limitations in precision and stability, resulting in low production efficiency and difficulties in meeting large-scale, standardized production demands. With industrialization, the introduction of machine bending equipment, such as manual and mechanical bending machines, significantly improved production efficiency and product consistency.
Today’s sheet metal bending production lines are typically equipped with advanced CNC bending machines, allowing precise control over bending angles and positions. Computer programming enables the rapid manufacture of complex-shaped metal parts, while Computer-Aided Design (CAD) and Computer-Aided Manufacturing (CAM) enhance mold production efficiency and accuracy. Rapid Prototyping technology facilitates mold modifications and optimizations, reducing the time from design to market. The development of intelligent modular molds allows for quick switching and timely maintenance, further improving bending operation efficiency.
Process Structure Design of Sheet Metal Bending Products
The structural design of metal sheet bending products must incorporate multidisciplinary knowledge, including processing properties of metal materials, mechanical engineering principles, and manufacturing processes. Functional requirements and usage environments influence material selection and structural design. High-strength and corrosion-resistant metals should be chosen, and reinforcement structures must be designed accordingly. Additionally, factors such as material thickness and deformation characteristics must be considered to establish reasonable bending areas, ensuring dimensional accuracy and structural strength.
During the design phase, production constraints such as bend radius and bending angles must be factored in. The bending sequence principles—bending from the inside out, progressing from small to large, and prioritizing special shapes before general shapes—must be followed to prevent interference in the initial forming process.
Effective process design ensures products meet predetermined quality standards and production efficiency. This includes selecting appropriate bending equipment, establishing detailed process flows, and designing precise molds. When selecting equipment, precision, stability, and suitability for various material thicknesses and hardness levels are critical. Mold design is equally important, as it directly impacts product quality and production efficiency, ensuring smooth metal flow during bending while minimizing risks of cracking or splitting.
Development of Sheet Metal Automatic Bending Processing Technology
Traditional sheet metal bending processes rely heavily on operators, making them a bottleneck in metal product processing. Thus, the gradual replacement of manual operations with automated processing technology is vital for enhancing production efficiency.
Sheet metal automatic bending processing exemplifies the application of advanced production technologies in the industrial era, with high-efficiency, high-quality, and highly flexible automated processing units becoming increasingly refined.
Three primary types of automated processing technologies have emerged: fixed manipulator bending processing, industrial robot bending processing, and automatic multi-edge bending unit processing. Each method offers unique advantages, and factory managers must consider their comprehensive benefits when implementing them.
1. Mechanical Arm Automatic Bending Unit
Mechanical arm automatic bending units can be categorized based on different automation integration devices, including X, Y, and three-axis manipulators, as well as integrated industrial robots. Three-axis manipulators are suitable for mass production of relatively simple sheet metal products, such as box-shaped parts. While they offer low investment costs and high efficiency for mass-produced parts, their limited spatial flexibility can hinder frequent production switching.
In contrast, industrial robot-integrated bending units excel in meeting modern market demands. By incorporating moving tracks, these units enhance the operational range of robots at different workstations, increasing compatibility for diverse product processing.
Robots position the sheet material flat on the bending machine’s lower die, utilizing back gauge sensors for precise positioning. After positioning, the robot sends a bending signal to the machine, coordinating the bending action effectively.
The bending accuracy of industrial robot units relies on the bending machine’s precision, the robot’s positioning accuracy, and the coordinated control between the robot and the machine. These standard units include mechanical fixtures, raw material racks, unloading stacks, positioning workbenches, flipping racks, hand-changing devices, and various detection sensors.
2. Integrated Multi-side Automatic Bending Unit
Unlike methods where manipulators grip parts for bending, integrated multi-side automatic bending units use manipulators to coordinate part movement with the bending machine for processing. This unit typically features high flexibility in its bending molds, greatly enhancing the machining capabilities of China’s machine tool equipment.
The integrated multi-side automatic bending unit includes a loading device, shuttle conveyor, main bending machine manipulator, and discharging device. The manipulator is positioned directly in front of the main bending machine, with automatic loading and unloading systems on either side.
These devices automatically connect with vertical warehouses to position raw materials, replacing manual work in positioning plates or workpieces. The manipulator performs pressing and bending tasks, while the main bending machine executes bending and forming based on programmed machine language codes. High-precision part processing, special mold surface treatments, and controlled mold running tracks enable efficient and high-quality processing of sheet metal parts.
During bending, an electric servo drive system controls mold movement for high-speed response and precise bending actions. This set of molds, known as a universal mold, allows the folding machine to perform various processes, including positive and negative angle bending and complex flat edgings, achieving high processing flexibility.
The automatic die change device comprises components such as the intermediate clearance die, standard section die, clutch moving device, and rotary inserting piece device, facilitating bending operations in different dimensions through clearance retracting and automatic length adjustments.


Reviewed by 1 user
Perfect press brake!