Hey there! You know, the demand for custom-made products has really gone up. And do you know what? Research has shown that sheet metal is super versatile! It can be changed into all kinds of different forms through custom sheet metal bending techniques and tips. These techniques are essential for shaping sheet metal into the required forms for various production purposes. But there are a bunch of processes involved in making this happen. If you want to know how to bend sheet metal using a press brake for custom bending and achieve high-quality results, you must have a good understanding of these processes.
In this article, we are going to explore why sheet metal bending is so important, how it fits into the sheet metal fabrication process, and of course, how to bend sheet metal. I will also share some useful bending tips that can help you when you are working with steel plates.
Table of Contents
What’s Sheet Metal Bending?
Did you know that most sheet metal parts are made by first cutting the metal into specific sizes, then bending it into the shape we want, and finally assembling them? So, you see, bending plays a crucial role in sheet metal fabrication.
Sheet metal bending is all about deforming that flat metal sheet into a specific angle or curvature. And here is the cool part - it does not change the thickness of the sheet. Instead, it is the plastic (permanent) deformation that gives us the final shape we are after. Usually, we use a press brake or a similar tool to apply pressure along a straight axis. This pressure bends the metal into the angle we need.
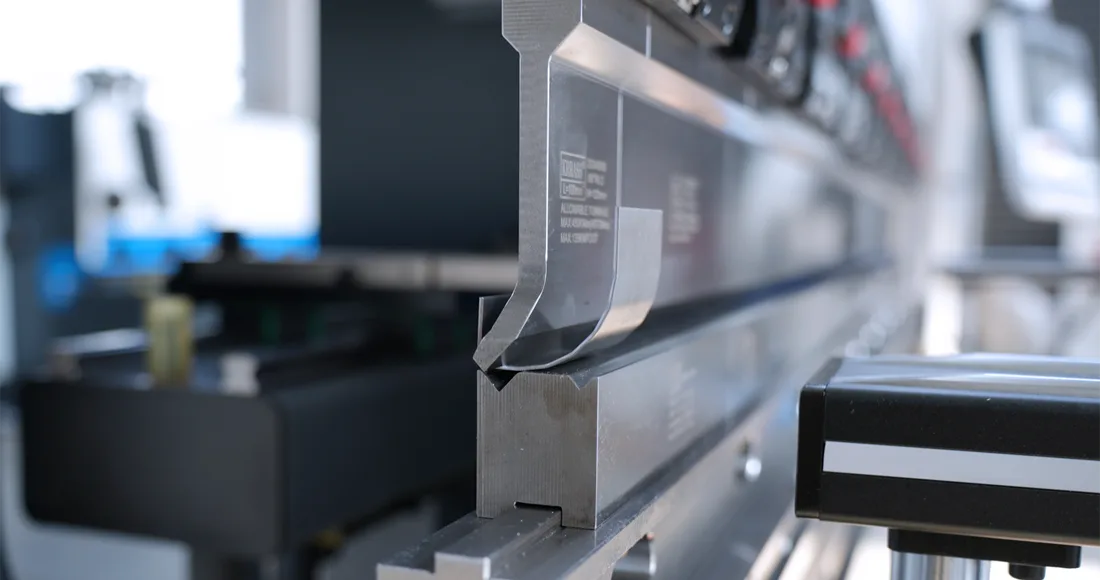
To really understand this, you also need to know about the punch-and-die setup. The punch is what applies the force to deform the metal against the die. And the die? It supports the metal and gives it the desired bend angle and radius.
How Is Sheet Metal Bent?
Step 1: Initial Design
The metal bending process starts with creating a detailed design of the final part. If you are doing CNC bending, you will need 3D files. You can create the design using software like AutoCAD or SolidWorks. But remember, the design must take a lot of things into account, like allowance, reliefs, spring back, and more.
You can use an online bending calculator to figure out the design variables and considerations. We will talk more about these later. Also, make sure to specify the clear dimensions and tolerances in your design.
Step 2: Preparing Your File
First, make sure your file is in a compatible format and that all the GD&Ts are taken care of. Now, the bend line indicator is important. It is how engineers and technicians communicate the design. Depending on the software and file format, it might be shown as solid lines, dashed center lines, or even assorted colors.
Step 3: The Bending Process
In this step, the sheet metal is deformed along a straight axis to create the angle or curvature we want. You will need to set up the tooling (die, punches, press brakes) according to your requirements and the specified angle. This process can create some complex parts, but it does have a limit - you cannot bend angles over 130°. Also, the bend radius changes depending on the material and its thickness.
Step 4: Finishing Processes
After the sheet metal operations, the surface might have some marks or an uneven texture. If you want to make it look better, you can use a surface finishing technique like painting, powder coating, sandblasting, or plating. But if the surface does not affect how the part works and you do not care too much about how it looks, you can leave it as it is.
Types of Metal Bending Processes
All the sheet metal bending methods have the same goal - to turn metal structures into the shapes we want. But they work in diverse ways. You see, when you are learning how to bend sheet metal, you need to understand that things like the thickness of the material, the size of the bend, the bend radius, and what you are using the part for all determine which method is best.
Let us look at the most common sheet metal bending methods:
V-bending
This is the most fashionable way to bend sheet metal. We use an instrument called the punch and v-die to bend the sheet metal at the angle we need. During the process, the bending punch pushes down on the sheet metal that is sitting on the V-die.
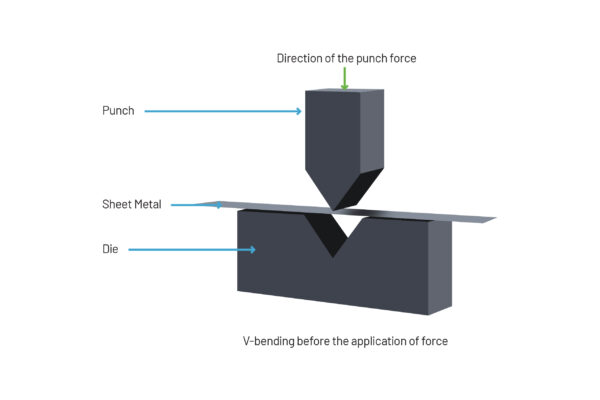
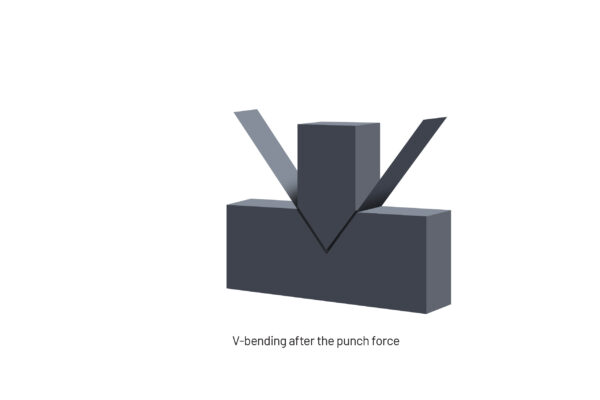
The angle that the sheet metal bends to depends on where the punch applies pressure. That is what makes this method so easy and efficient - you can bend steel plates without having to move them around.
The V-bending method can be divided into three types:
Bottoming
You can think of bottoming as being like the air bending process, but there is a difference. In bottoming, the punch pushes the sheet all the way into the die until it touches the cavity surface. This gets rid of the spring back problem that can happen with the air method.
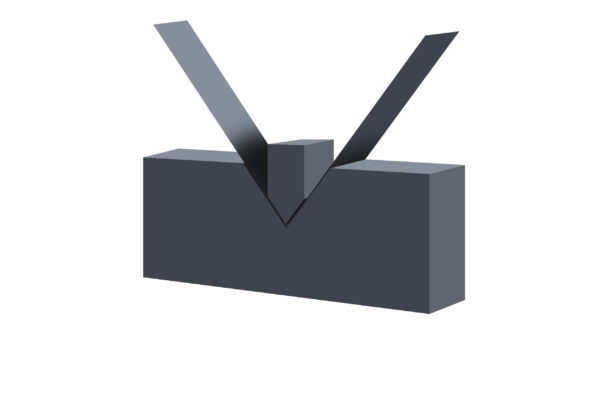
Bottoming needs a punch with more power because it must apply extra force to deform the metal and hold the sheet for a bit after it is bent. It works with V and V dies.
Also, this technique is more accurate. And compared to other processes, you do not need to control the tonnage as precisely. So, even old, and not-so-accurate punches and press brakes can be used for bottoming.
Coining
Coining is all about squeezing the sheet between a punch and die with a lot of force. This gives us really accurate bent angles with almost no spring-back.
But there is a downside. Coining needs a lot of force, and it takes longer than other methods.
Air Bending
Air bending, or partial bending, is not as accurate as bottoming or coining. But we often use it because it is simple and easy to do - you do not even need special tools.
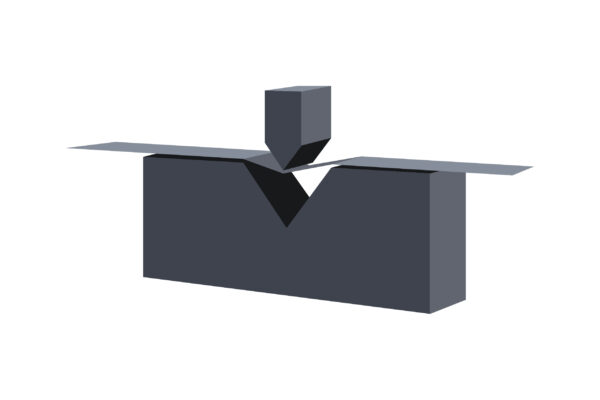
There is a problem, though. Air bending is the only method where the sheet metal might spring back.
In air bending, the punch pushes on the sheet metal that is resting on the die's opening. We usually use a press brake for V bending because the sheet metal does not touch the bottom of the die.
(A press brake is a simple machine used in sheet metal bending. It holds the sheet metal in place so the punch and die can bend it into the shape we want.)
Roll Bending
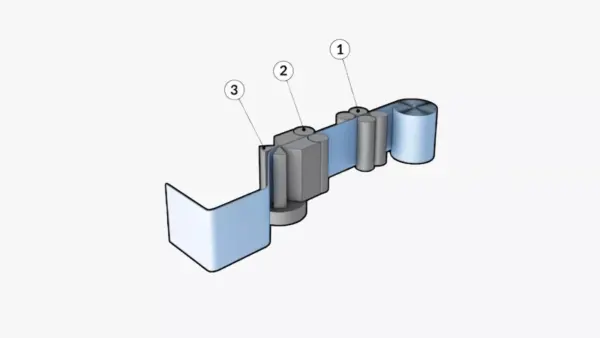
The roll bending process uses 2, 3, or 4 rollers to shape the metal sheet into curves. The most common setup is the 3-roll configuration, where the rollers are set up in a triangle. The upper roller can be adjusted, and the other two stay in place.
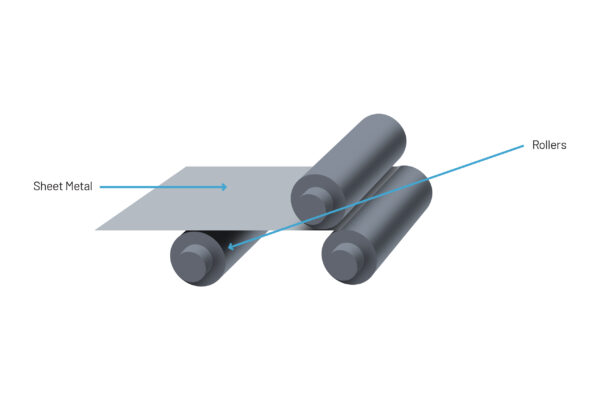
We feed the metal sheet between the upper roller and the two fixed rollers. As the fixed rollers turn, they grip the sheet, and the adjustable roller pushes down to create the curve we need. The 4-roll setup has an extra roller for more support, which is great for heavy-duty work.
This method is used to make cylindrical and conical shapes in sheet metal fabrication, like tubes, cylinders, tanks, pressure vessels, and pipes.
Wipe Bending
Wipe or Edge bending uses a wiping die and punch. The sheet is held between the die and a holding pad, with the part we want to bend sticking out. Then the punch or wiping flange moves down and bends the edge of the part into the right angle. This is a suitable alternative to using a press brake for smaller parts.
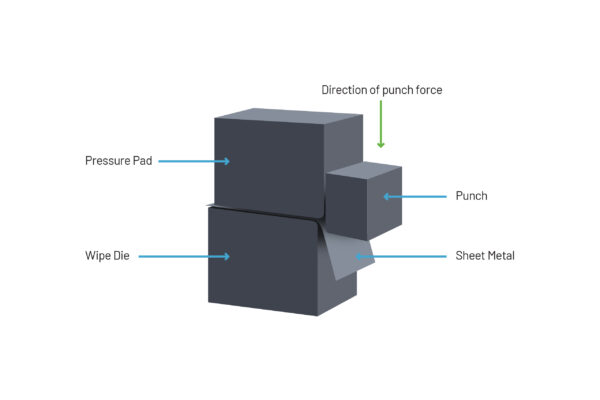
With this technique, we can shape all sides of the edge at the same time, which makes the process faster. And there is less risk of the surface cracking in the bent area.
Rotary Bending
This is more common for bending tubes and pipes into curves from 1 to 180°. But it is not just for bent sheet metal. The process uses a bend die, a clamp die, and a pressure die. The bend die and clamp die hold the work, and the pressure die pushes on the free end to create the curve. The rotary die can turn to the position and radius we need. And for tubes and pipes, we put a “mandrel” inside, but we do not need it for sheet metal.
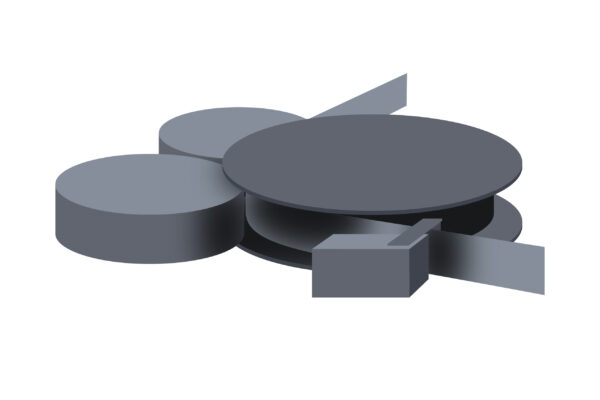
This metal-forming process is good for making curved shapes from flat sheets. It also has a lot of uses in tube shaping.
We have more control over this process, so we can get a really accurate radius. We can easily achieve a tolerance of ± 0.5. And because it uses less force (50 to 80% or less), the surface is less likely to crack or have other problems.
Sheet Metals for Bending
There are lots of different metals and alloys that we can use for bending. The properties of each material affect things like how much force we need and how much the metal springs back. And because there are so many options, we can choose the best material for what we need the part to do and how well it needs to perform.
Also, the maximum thickness of the metal sheet that we can bend depends on the material. For example, aluminum is more formable than titanium, so we can bend it into thicker sheets.
Stainless Steel
Stainless steel is versatile. It is strong, tough, and resists corrosion, which makes it great for making parts with small radii. We often use grades like 304, 316, and 430. But because it is hard, we need more force to shape it, and we must be careful about the spring-back to make sure our parts are accurate.
Steel
Steel alloy grades like A36, 1018, and 4140 are popular for metal bending. They are strong, durable, cost-effective, and can be used in lots of diverse ways. Sometimes we need to heat treat steel for more complicated jobs, but it is still easier to work with than stainless steel. Mild steel is especially easy to shape.
Aluminum
Aluminum is easy to form into different shapes and curves. It resists corrosion well and has a good strength-to-weight ratio. We use aluminum bent parts a lot in aerospace, automotive, and electronics. But be careful - it can crack, especially when we are bending it into small radii.
Brass
Brass is easy to bend and conducts electricity well. We often use grades like CZ129/CW611N for sheet metal forming. Because it is so easy to shape and conducts electricity well, we like to use brass in electrical, thermal, and plumbing applications.
Copper
Copper is a soft metal, so it is easy to bend sheets of it. But we must be careful when we handle it and control the force we use to avoid damaging or cracking the surface. And because it looks shiny, it is popular in electrical and other applications.
Key Concepts in Custom Sheet Metal Bending Techniques and Tips
When we are bending sheet metal, there are some important concepts we need to know. These are things we must think about when we are designing the parts and figuring out the dimensions after the bending is done. But first, let us understand some of the terms related to this.
- Neutral Axis: This is an imaginary line in the sheet metal. When we apply force to bend the metal, this line does not stretch or compress.
- Tension Zone: This is the area on the outside of the bend where the metal stretches.
- Compression Zone: This is the area on the inside of the bend where the metal gets squeezed together.
- Bend Line: This is the line where the sheet metal bends.
- Flange Length: This is the length of the straight and flat part that sticks out from the bent part.
Now, let us look at the key concepts:
Bend Radius
This is the radius of the curved part of the sheet metal after we have bent it. Every design starts with this important variable. It affects how accurate the dimensions are, how strong the final part is, what shape it has, and how structurally sound it is.
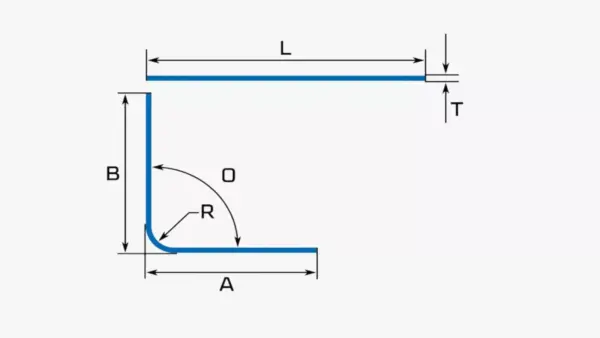
Depending on the type of material and its thickness, there is a smallest radius we can bend the metal to. We cannot go smaller than that. Usually, the radius should be at least as big as the thickness of the sheet.
Minimum Bend Radius (Rmin)= Thickness(t)
Bend Deduction
When we bend the metal, the total length of the flat part gets a little shorter because the bent part stretches some of the material. So, we need to subtract some length to get the right total flat length. This is called bend deduction. It is the amount of material we need to take away from the total length of the flat sheet metal to get the dimensions we want.
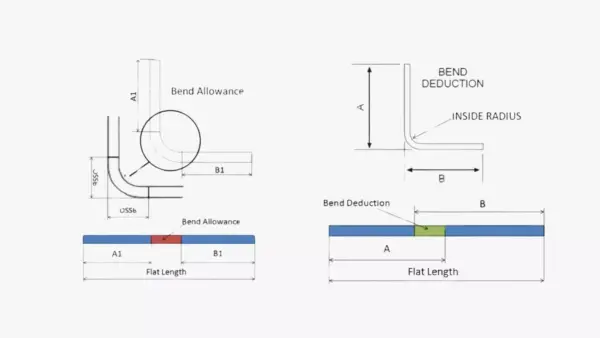
Bend Deduction=2× (Outside Setback−Bend Allowance)
It is important to think about this deduction when we are designing to make sure our parts are the right length and meet all the other specifications. The thickness of the sheet metal, the radius, and the type of material all affect how much we need to deduct.
Bend Allowance
Bend allowance is a term we use in manufacturing. It is the extra space we give to account for the sheet metal stretching and bending. When we change the shape of the sheet metal from flat, its size also changes. The force we use to bend it makes the material compress on the inside and stretch on the outside.
This deformation changes the overall length of the sheet metal because of the compression and stretching on the bend. But the length between the inner compressed surface and the outer stretched surface stays the same. This is shown by a line called the “neutral axis.”
The allowance depends on the thickness of the sheet metal, the angle of the bend, the method we use to bend it, and the K-factor (a number that helps us estimate how much the material stretches). It is a way to measure the ratio of how much the inside compresses to how much the outside stretches.
When the inner surface of the sheet metal contracts, the outer surface expands. So, the K factor stays the same every time we bend sheet metal. The K-factor (usually between 0.25 to 0.5 max) helps us calculate the design variables. It tells us how much material we need before we cut the sheet metal and is also useful for making the sheet metal bend radius chart.
K-Factor
This is another important part of sheet metal bending design. The k-factor tells us about the shape of the bent sheet metal and helps us calculate other design variables like the allowance we need. The K-factor is defined as “the ratio of how much the neutral axis moves from its original position to the thickness of the sheet.” The K-factor value can be anywhere from 0 to 1. For example, if the K-factor is 0.2, it means the neutral axis will move 20% of the thickness. Also, the recommended value for the K-factor is different for each type of material and bend radius.
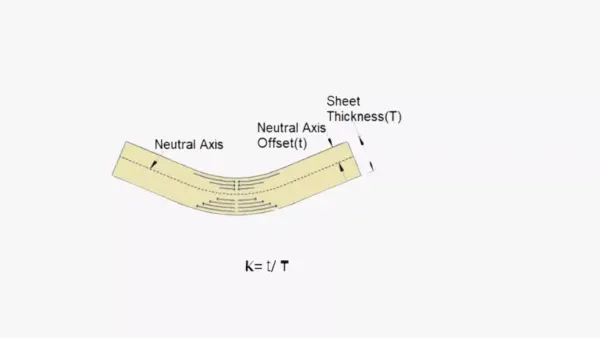
The K factor also gives us an idea of how much the material stretches and expands on the inside and outside of the bend. So, it is important for calculating the design parameters related to the flat length.
Bend Relief
Bend relief is a small cut at the end of the bend line. We do this to stop the material from deforming or tearing. It is important for making sure the final parts and products are structurally sound and accurate. We can use notches, holes, or cutouts for this.
But we do not need to worry about bend relief if we are making a straight bend from one edge to another. We only need to think about it if we are separating the bent part from the flat material in a place other than the edges. The reason for this is that if there's material right after the compressed material, we need to adjust the flat material.
The rule for calculating the relief is:
Minimum width and depth of the relief= Thickness(t)/2, Thickness (t) + bend radius(R) + 0.5 mm.
Another similar concept is corner relief. This is the length we need to cut out at the place where the bend lines meet. So, at the corners, we need to make a cut-out to make sure everything lines up perfectly and to avoid tearing the material.
Spring Back
Sheet metal does not always stay in the shape we bend it into. When we let go of the force, it might go back a little bit. This can change the dimensions and make our parts not as accurate as we want them to be. So, when we are designing, we need to make some adjustments to account for the spring back.
To understand this, we need to know about permanent and elastic deformations. Elastic deformations try to make the metal go back to its original shape, while permanent deformations keep the new shape. Some of the elastically deformed material around the bending line tries to go back to how it was, and that is what causes the spring back. Also, things like the method we use to bend the metal, the radius, and the properties of the material all affect how much the metal springs back.
Bend Sequence
This is the way we plan out multiple bends in a single sheet so that they do not interfere with each other or cause any distortion. We sequence the bends based on their size and how complicated they are. Usually, we start with the big and simple bends and then do the more complex ones. The sequence also depends on the die and tooling we are using. It must work with the tools we have (dies and press brake).
Grain Direction
All metals are made up of tiny crystals inside, and these crystals are arranged in a repeating pattern. The individual crystal regions are called grains. The way these grains are oriented and shaped can be different for each type of material and how it is formed, like if it is forged or cast.
When we are using a press brake, if we are making a tight angle or curve, thinking about the grain direction can help us avoid cracking. The grain direction should be at a right angle to the bend to stop the metal from cracking.
Practical Tips for Designing Bent Sheet Metal Parts
Sometimes, even a small mistake or something we forget in the sheet metal design can cause big problems when we are bending the metal. So, every little detail matters when it comes to the quality of the final parts.
Here are some practical tips for designing.
Maintain Uniform Thickness
The sheet metal you are working with should have the same thickness all the way through. If it does not, you will get an inconsistent bend radius, and it is more likely to crack or warp. Usually, you can choose a thickness between 0.5 to 6mm.
Bend Radius and Orientation
There is a minimum bend radius, and it depends on the type of material and its thickness. A good rule to remember is that “the minimum radius should be at least as big as the sheet thickness.” And when it comes to orientation, make sure the radius is the same all along the bend line and that the bends are all in the same plane.
Avoid Successive Bends
If you put bends too close together in your design, it can cause problems with how the parts line up and increase the stress left in the metal. So, it is important to leave enough space between bends. A good rule is to have at least three times the thickness of the sheet between them.
Use Bend Relief
If your bends are close to the end of the sheet, the metal can tear or crack because of too much stress. To stop this from happening, use reliefs like small cutouts or notches at the start and end of the bend line.
Proper Hole and Slot Placement
If your design has holes and slots, you need to be careful where you put them. Their size and how far they are from the bend can matter. If a hole is too close to the curved part, it can distort the material.
- Minimum distance (bend to hole) = 2.5 t + R
- Minimum distance (slot to hole) = 4t + R
- Minimum distance (edge to hole) = 3t
- Minimum hole radius (r min.) = 0.5 t
Here, t is the thickness of the sheet and R is the bending radius.
Countersink Design
You can make countersink features by machining or punching with a press brake. There are some rules for where to put them in your design.
- Maximum depth = 0.6 t
- Minimum distance from bend: 3t
- Minimum distance from edge: 4t
- Distance between two countersinks = 8t
Correct Curl Dimensions
A curl is when you bend a circular roll (hollow) at the edge of a metal sheet. It helps keep the edge strong and not sharp. When you are designing a curl, think about these things:
- Minimum outer radius = 2t
- Minimum distance (bend to curl) = Curl radius + 6t
- Minimum distance (hole to curl) = 2 x Curl radius + t
- Lastly, make sure the curl does not cross over other features.
Designing Hems
Hems are folded-back edges on sheet metal parts. They can be open or closed, and sometimes joining two hems can act like a fastener. When you are bending sheet metal to make hems, make sure to follow these rules:
- Minimum inside radius = 0.5 t
- Minimum return length for the closed hem = 4t
- Minimum return length for the open hem = 4t
- Inside edge of bend to hems outside edge = 5t + Hem radius
Flange and Chamfer Design
A flange is an edge that sticks out from the main body of a sheet metal part, usually at a 90° angle. If your design has flanges, think about these dimension limits:
- Minimum flange length = 4t
- Minimum bend radius = t
- Minimum bend-to-flange distance = 2t
Tabs and Notches
Tabs and notches are features on sheet metal that are often used to join parts together. A tab is a small extension on the edge, and a notch is a small cut-out. But if they are not in the right place, they can make the material weaker. So, follow these design rules:
- Minimum bend to notch distance = 3t + radius (R)
- Minim distance between notches = 3.18 mm
- Minimum notch length = 2t
- Minimum notch width = 1.5 t
- Maximum tab and notch length = 5 x width of tab (w)
- Notch corner radius = 0.5 t
5 Tips for Bending Steel Plates
Bending steel plates can seem a bit hard, but with these tips, it can be easier. Here are some things that can help you:
Watch out for spring back
When you are bending a sheet, you must bend it more than the angle you want. That is because sheet metal can spring back to its original position. So, you need to plan for this by bending the material a bit more than you needs.
Is the sheet metal malleable enough?
If you try to bend a sheet metal into a sharp corner, it might crack. So, you should avoid this if you can. You also need to think about the thickness of the steel. Not all materials are soft enough to bend into sharp corners.
Always use a press brake
If you can, always use a press brake. It gives the sheet metal the support it needs and makes for cleaner bends and a more even pattern across the bent sheets.
Do not forget the process position holes
Make sure to create process position holes in the parts you are bending. This will keep the sheet metal in the right place in the die. It stops the sheet metal from moving during the bending process and makes sure all your bends are accurate.
Bend Allowance
Thinking about the bend allowance is important when you are learning how to bend sheet metal. It helps you get more accurate numbers and makes sure your finished products are exactly right.
Conclusion
The demand for custom-made products is always going to be there, and if you want to make custom metal products, you need to know about sheet metal bending. In this article, we talked about sheet metal, why it is important, and what you need to know to bend it into the shape you want.
Just understanding the process of sheet metal bending is not sufficient. Moreover, achieving high-quality results independently can be quite challenging. However, if you prioritize both quality and rapid production, KRRASS's metal bending equipment is an invaluable asset. Our state-of-the-art equipment empowers you to enhance your production efficiency and quality. Leveraging our advanced engineering and precision manufacturing, you can effortlessly transform your designs into tangible products, thereby gaining a significant competitive advantage in the shortest possible time.
FAQs
What is the best sheet metal bending method?
Figuring out the best sheet metal bending method can be tough because each technique is for different things and makes different shapes. For example, air bending is good for lots of varied materials and is great for general uses. Bottoming is more accurate and is better when you need precise parts. Roll bending is often used to make big curves, like for cylindrical parts. So, the best bending method depends on what you are using the material for and what shape you need.
Is sheet metal easy to bend?
Bending steel plates can be a bit tricky, but if you understand the process well, it is not that hard. You need to know which methods to use and what tools are available. You can read this article to get a better idea of how it all works.
What are the advantages of sheet metal bending?
The main good thing about bending is that we can make complex parts without having to join things together. It is also accurate, cost-effective, and can be used in lots of diverse ways. We can make strong and long-lasting parts for all kinds of industries.
What are the disadvantages of sheet metal bending?
Bending metal needs special tools and equipment, which can cost a lot to set up. Some materials can crack when we bend them. And bending can also leave stress in the metal, which might make it not as strong structurally.
